

In search of Lightroom suggestions and tips to enhance your workflow, enhance your velocity, and improve your edits? You’ve come to the correct place.
I’ve been utilizing Lightroom for over a decade, and on this article, I share my high recommendation for wonderful outcomes, together with:
- The panel that everybody ought to use for lovely, creative edits
- A simple method to apply advanced edits at excessive speeds
- The most effective instruments for creating fine-tuned, skilled results
Let’s do that!
1. Create colour harmonies utilizing the HSL panel
In the event you’ve by no means labored with the Lightroom HSL panel, you then’re in for a deal with. It’s just a little possibility hidden beneath the Tone Curve that appears like this:

The panel works by focusing on completely different colours independently. You’ll be able to select to tweak solely the reds in a picture; you’ll be able to brighten solely the greens; you’ll be able to desaturate solely the blues. You merely decide the corresponding colour slider, then make the mandatory changes.
Notice that the HSL panel permits you to alter colours in three particular methods. You’ll be able to:
- Change colour hues. You may make the reds extra orange, the purples extra pink, or the blues extra inexperienced.
- Change colour saturation. You may make the blues extra light or the reds extra intense.
- Change colour luminance. You’ll be able to brighten up the greens, darken down the blues, or brighten up the yellows.

Whenever you’re simply beginning out, I’d suggest merely experimenting with the completely different sliders till you get an impact that you just like, however listed below are a couple of concepts to strive:
- Take away all of the cool colours from a picture for a heat, cinematic look
- Saturate the colour of the principle topic whereas desaturating the colours within the background
- Push a number of completely different colours in the identical course for an easier colour palette (and a extra harmonious consequence)
This picture, for example, includes a heat colour palette (which may be achieved by desaturating blues, greens, and magentas:

2. Attempt the automated slider changes
Typically, it may be onerous to know how one can begin (or proceed) a Lightroom edit.
In such circumstances, I like to recommend a easy little trick:
Maintain down the Shift key, then double click on on the sliders within the Fundamental panel. Lightroom will analyze your picture, then apply changes routinely.

No, the edits gained’t all the time be excellent, however they typically look good – and should you hate the consequence, you’ll be able to all the time double-click on the slider identify to set it again to zero. Plus, you’ll be able to all the time use the automated settings as beginning factors, then edit from there.
By the best way, if you wish to see all of Lightroom’s automated edits without delay, simply click on the Auto button above the Publicity slider:

It’ll immediately alter the sliders within the Fundamental panel!
Now, these automated changes don’t work for all Lightroom sliders. They gained’t work outdoors the Fundamental panel, and so they gained’t work on the Texture, Clarity, and Dehaze sliders.
However you can use it to routinely alter the white balance, the publicity, the distinction, and even the saturation – so why not give it a attempt to see what you assume?
3. Use the clipping masks (or the clipping warnings)
Clipping refers to a lack of element within the highlights and/or the shadows of a picture – and usually, clipping is fairly unhealthy.
Sadly, it may be tough to inform whether or not you’re really clipping particulars whereas modifying, and it’s attainable to exacerbate clipping points by pushing your sliders too far with out realizing it. You’ll be able to all the time control the histogram, however it may be tough to interpret, particularly for newcomers.
Happily, Lightroom has an answer: The clipping masks, which clearly point out clipping in real-time.
Earlier than you alter the Publicity, Highlights, Shadows, Whites, or Blacks slider, merely maintain down the Alt/Decide key. Then, whenever you enhance or lower the sliders, you’ll see a white or a black overlay, like this:

A masks that reveals zero clipping might be all white or all black. However a masks that reveals some clipping will change colours over the issue areas:
(Notice that, when adjusting the Blacks or the Shadows, clipping is indicated as colour on white. Then again, when adjusting the Publicity, the Whites, or the Highlights, clipping is indicated as colour on black.)
So long as you don’t have any clipping, you’re good to go – however as quickly as you begin to see a lack of element, you’ll wish to dial again the depth of your edits. Make sense?
Yet another fast Lightroom tip: If you wish to determine clipping however you don’t wish to spend time trying on the masks, you’ll be able to all the time click on the arrows on the high of the histogram:
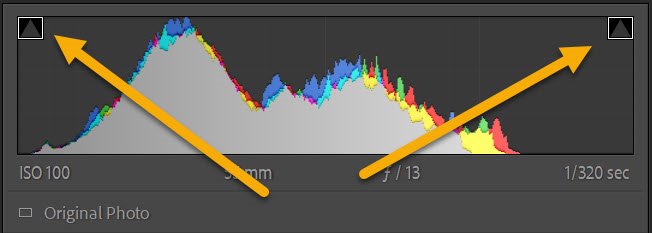
It will activate the clipping indicators, which can trigger clipped shadows to show blue and clipped highlights to show crimson:

4. Use the copy-paste shortcut to hurry up your workflow
Say you’re modifying a big quantity of images from an occasion, a marriage, or a portrait photoshoot. You might want to transfer by way of the images rapidly, so that you don’t wish to edit every file individually.
You might create presets, however every one takes time to supply, and if the presets are photoshoot-specific, you could by no means use them once more.
As a substitute, why not use Lightroom’s copy-paste possibility?
You see, after you edit a picture, you’ll be able to all the time choose Edit>Copy (or press Ctrl/Cmd+C). A window will pop up, asking you which ones settings you wish to copy:

Then, when you’ve chosen the related settings, choose your to-be-edited images, then select Edit>Paste (or press Ctrl/Cmd+V).
The settings out of your authentic picture might be pasted onto the chosen photographs, and your modifying work might be accomplished!
This may be an effective way to deal with advanced photoshoots. As an illustration, should you captured photographs in a number of forms of mild, you would possibly edit the primary front-lit image, copy the settings, and paste them throughout all of the remaining frontlit photographs. You possibly can do the identical for the backlit photographs, the shaded photographs, and so forth – and should you require much more management over your outcomes, you can also make slight changes to your settings as you go, then copy once more and paste as required.
I do have one suggestion, although:
Even should you assume you’ve accomplished a profitable copy-paste job, rapidly undergo the edited photographs and ensure every part seems okay. You don’t wish to ship photographs to a consumer, solely to comprehend that you just cropped all of the recordsdata accidentally!
Lightroom presents a handful native adjustment choices – known as masking tools – and they’re insanely highly effective. You could find them towards the highest of the modifying panels, simply beneath the histogram:

Not like world changes, which have an effect on your entire picture, native changes solely change a portion of a file.
So whilst you can brighten up a complete picture utilizing the Publicity slider, you’ll be able to brighten up simply the foreground utilizing a neighborhood adjustment; whilst you can sharpen your entire picture utilizing Lightroom’s Element sliders, you’ll be able to sharpen solely the principle topic utilizing a neighborhood adjustment. They’re an effective way to create fine-grained, detailed edits that add depth, improve colour, and push the viewer’s eye towards the principle topic.
I like to make use of native changes for all types of issues, however listed below are a couple of concepts:
- Use a Radial Gradient to add a vignette (i.e., a darkening impact) across the edges of the body
- Use a Radial Gradient to spice up the publicity of the principle topic
- Use a Linear Gradient to lower the publicity and enhance the distinction within the sky
- Use a Linear Gradient to darken the foreground

Actually, relating to native changes, the sky is the restrict. Be happy to make use of the ideas I offered above, but additionally ensure you experiment. That manner, you’ll get a deep sense of how the masking instruments work and what they will do to your images!
Lightroom suggestions and tips: last phrases
Effectively, there you could have it:
5 tricks to take your Lightroom modifying to the following stage.
So check out these ideas. See how you want them. And tell us within the feedback how they work out!
