")

This text was up to date in February 2024 with contributions from James Maher and Jaymes Dempsey.
I like to do street photography at evening. The town is lit with a myriad of fascinating and colourful mild sources, akin to lampposts, neon indicators, retailer home windows, automobile lights, and naked bulbs. Folks stroll round of their favourite outfits. Scenes that appear bland by day flip ominous and interesting after darkish.
However capturing lovely evening avenue images might be laborious. You need to select the right settings, cope with camera shake, discover the right topics, and extra. It’s sufficient to present anybody a headache!
Luckily, I’ve been doing avenue images at evening for a few years. And over time, I’ve picked up loads of ideas, tips, and nuggets of knowledge that’ll enhance anybody’s avenue evening capturing. I’ve examined totally different settings, I’ve decided tips on how to deal with nighttime lighting, and I’ve realized tips on how to keep protected.
So to find my prime avenue evening images ideas – and to learn to seize attractive photographs even within the darkness – learn on!
The most effective digital camera settings for evening avenue images
Capturing sharp avenue images at evening (or at any time, actually!) is generally in regards to the shutter velocity, in order that’s the place I’d like to start out.
To freeze movement in the course of the day, I desire to make use of a shutter velocity of 1/320s (with 1/160s as my decrease threshold). However at evening, this adjustments. Within the brightest areas – lit by streetlights or automobile headlights – you’ll be able to comfortably {photograph} at 1/250s, however more often than not, you’ll want to make use of a shutter velocity between 1/60s and 1/160s. In any other case, you’ll be compelled to spice up your ISO to ridiculous heights, and also you’ll danger ruining your photographs with noise.
Be aware that when your shutter velocity is about to 1/60s, you’ll want regular arms. (A lens or digital camera with picture stabilization might help; thankfully, most first rate mirrorless cameras today do include in-body picture stabilization, and most lenses have it, too!) Be aware that, to {photograph} handheld at 1/60s, you should cease your personal movement fully. Luckily, with some observe, this may be performed – simply be sure to’re at all times being attentive to your hand actions as you press the shutter button.
As for one of the best aperture setting for evening avenue images: The broader the aperture, the sooner you may make your shutter velocity (or the decrease you’ll be able to drop your ISO). It’s attainable to shoot at f/4 in brighter areas at evening, however when you can shoot at f/2.8, f/2, and even f/1.8, you’ll have a a lot simpler time. In different phrases, the broader your aperture for evening avenue images, the higher. (That stated, wider apertures include a serious downside: extraordinarily shallow depth of subject. Subsequently, as I clarify under, you’ll have to focus very rigorously to keep away from producing a slew of out-of-focus photographs.)
Lastly, you’ll want to lift your ISO to 1600, 3200, and even 6400. With trendy digital cameras, you’ll be able to {photograph} at excessive ISOs and are available away with first rate photographs, and whereas it’s at all times greatest to maintain the ISO as little as attainable, you simply received’t handle to get well-exposed photographs at evening in any other case. (I personally shoot at ISO 3200, and I typically go to ISO 6400 in particularly darkish areas or once I’m photographing fast-moving topics.) Plus, grainy photographs at evening can look surprisingly good; the grit provides to the aesthetic, particularly when you convert to black and white.
What digital camera mode must you use? In case you’re doing fast-paced capturing in a wide range of totally different lighting situations (i.e., shifting out and in of the road lights), Aperture Precedence can work nicely – simply set your digital camera to your widest aperture and highest tolerable ISO, then let it select the shutter velocity for you. (If the shutter velocity drops under 1/60s, then you definitely’ll both want to just accept some blurriness, enhance that ISO additional, or shoot in an space with extra mild.)
And as to your technique of focusing: Usually, zone focusing is a good technique for avenue images, however when utilizing an ultra-wide aperture at evening, you’ll find yourself lacking numerous photographs. You possibly can strive utilizing handbook focus to prefocus in a sure space when you can anticipate a shot upfront, however working with steady AF and certainly one of your digital camera’s monitoring modes may be the higher possibility, relying in your digital camera’s functionality. (In case you’re unsure what’s going to work greatest, attempt to do some experimentation!)
Important gear for nighttime avenue images
The most effective nighttime avenue images gear is broadly much like daytime avenue images gear in that you really want your tools to be light-weight, compact, and inconspicuous. That stated, there are some things to bear in mind when buying new tools for these nighttime adventures:
Choose a digital camera with good high-ISO capabilities
Because you’ll typically be capturing at ISO 3200, ISO 6400, and even past, it’s important that you simply use a avenue images digital camera that received’t break your photographs with an explosion of noise. Take into account investing in a compact full-frame digital camera or a top-notch APS-C mannequin, and attempt to preserve the megapixel rely on the decrease facet, as ultra-high MP cameras have a tendency to really carry out worse when capturing at excessive ISOs in comparison with the decrease MP siblings (assuming the know-how is from the identical technology).
Low-light focusing capabilities are additionally very useful – many cameras battle to amass focus at midnight, whereas others are excessive performers on this space. In case your digital camera can’t focus in close to darkness, that’s not an absolute dealbreaker – you’ll be able to focus manually or shoot within the streetlights – nevertheless it’ll actually restrict your flexibility.
Choose a lens with a large most aperture
As I discussed above, you’ll wish to be sure to decide a compact lens for capturing the streets at evening. However whereas most daytime avenue images is shot at an aperture of round f/8, nighttime is an entire totally different ball sport. You’ll have to widen your lens’s aperture to its most, which signifies that the broader the utmost aperture that’s supplied by the lens, the higher.
Subsequently, I’d advocate grabbing a lens with a most aperture of at the very least f/2.8 (and f/1.8 or f/1.4 might be even higher, assuming the fashions are nonetheless comparatively compact).
It may possibly additionally assist to seize a barely wider prime than you may be inclined to make use of in any other case, akin to a 35mm, 28mm, or – when you’re fascinated by a extra distinctive look – 24mm. Wider lenses are much less vulnerable to digital camera shake, and so they’re additionally simpler to make use of at evening for the reason that darkness and lack of exercise ends in fewer distractions all through a broader scene.
In fact, you’ll be able to nonetheless use a regular 50mm lens for nighttime avenue images – a 50mm f/1.8, as an illustration, is nice in practically each street-photography situation – however if in case you have the chance to go large, I’d advocate at the very least testing it out!
10 ideas for evening avenue images
Now that you simply perceive one of the best settings and tools for photographing the streets at evening, let’s check out just a few ideas – for each novices and superior avenue shooters – to boost your outcomes.
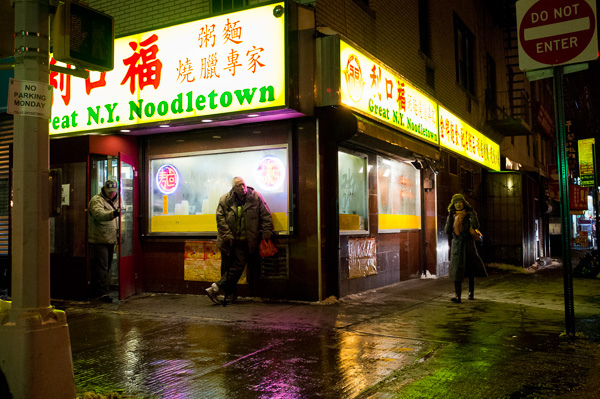
1. Hunt down mild sources
All the time take note of the principle mild sources in a scene. That is true regardless of the place or if you end up photographing, nevertheless it turns into much more essential at evening. So as an alternative of attempting to find topics, begin by discovering a fantastic mild supply or an space with good lighting, then wait round for one thing to occur.
Be aware that evening avenue images lighting might be something: automobile headlights, streetlights, neon indicators, window lighting, and even smartphone mild. Merely search for noticeable illumination, then pay cautious consideration to how these mild sources hit potential topics. Modify your angle till you get the lighting impact you need, then shoot away!
Once I was photographing the streets of New York City, I discovered a fantastic restaurant with shiny home windows. I used the restaurant lighting to carry out element within the passersby:
2. Take loads of photographs
Typically, avenue photographers like to make use of a extra deliberate method, capturing solely a few photographs of every topic. This works nice in the course of the day, particularly when you can confidently nail the main target and publicity – however at evening, it’s a recipe for lots of failed photographs.
So as an alternative of simply taking one or two photographs of every topic or scene, once you’re out at evening, push issues a bit. Don’t be afraid to seize 5-10 photographs of the identical topic, and when you’re prepared to kind by means of all of the photographs later, you would possibly even think about using your digital camera’s burst mode to fireside off dozens of photographs in just a few seconds.
The thought right here is to easily maximize your possibilities of success. The extra you shoot, the extra doubtless you might be to hit on that second when your topic is shifting slowly sufficient to remain sharp, even at 1/60s – and the extra doubtless are you to nail the main target even with a razor-thin depth of subject.
3. {Photograph} nightlife
Sure elements of town – such because the enterprise district – can empty out at evening; they’ll make for a poor evening avenue images expertise. Different areas, nevertheless, will get busier after sundown, and so they’ll supply loads of alternatives.
So search out the nightlife and shoot it! You would possibly take into account performing some web searches for bars and golf equipment in your space, then be sure to head on over because the evening begins. Alternatively, when you’re after extra formal-looking topics, go for a stroll close to some upscale eating places and see what yow will discover!
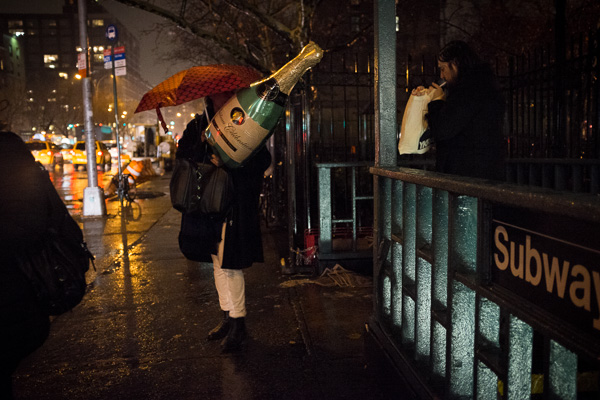
And don’t really feel such as you’re restricted to photographing individuals on the road exterior golf equipment and eating places. You possibly can seize all types of beautiful results by capturing by means of home windows (plus, when you’re feeling a bit nervous about photographing individuals, the window can act as a barrier and scale back your anxiousness).
4. Alternate between getting shut and stepping again
I’m a giant proponent of Robert Capa’s recommendation that “in case your images aren’t ok, you’re not shut sufficient.” Nevertheless, I typically violate this rule at evening.
You see, whereas I do attempt to get near lots of my topics – and I encourage you to do the identical – I additionally attempt to create compositions the place the themes are small facets of the general scene. At evening, backgrounds might be rather more lovely than in the course of the day, so it typically pays to have individuals develop into the secondary factor within the scene, moderately than the first focus.
This method comes with a technical benefit: When your topics are off within the distance, you received’t want to make use of a quick shutter velocity to seize their movement. A close-by topic might be frozen at 1/125s or sooner; a distant topic can typically be photographed at 1/60s and prove sharp, even when it’s on the transfer.
5. Experiment with a tripod for inventive results
When doing avenue evening images, it’s often greatest to go handheld. In spite of everything, you by no means know what fascinating issues are about to occur, and also you need to have the ability to react quick.
That stated, it may be helpful to carry alongside a tripod, particularly when you’re fascinated by capturing some long-exposure street photography.
The thought right here is to discover a busy space, mount your digital camera on a tripod, then use a sluggish shutter velocity to seize individuals in movement. You’ll have to experiment with totally different shutter speeds (1/8s is an efficient start line), and also you’ll have to shoot a lot of images, however you’ll finally find yourself with some attractive movement blur results:
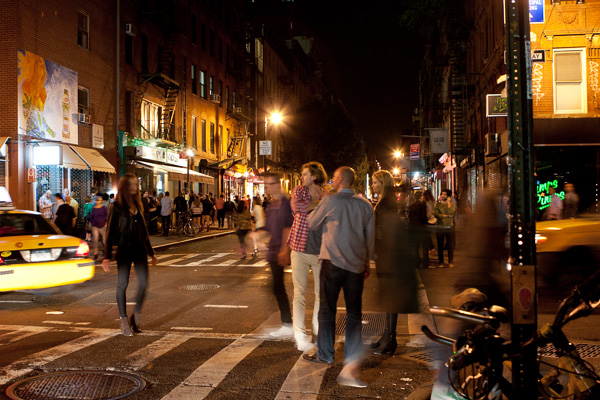
It took me a very long time to seize the picture displayed above; I wished the individuals unfold all through the complete scene, and I additionally wished an fascinating foreground topic (in the long run, I used to be happy by the pose of the girl on the street and the person taking a look at her).
6. Strive working with a flash
Some avenue photographers love utilizing a flash, whereas others hate it. Whether or not you determine to strive flash at evening is as much as you; on the one hand, it’ll present further illumination so you need to use a sooner shutter velocity, a narrower aperture, and a decrease ISO. Then again, it’ll give a really intense deer-in-the-headlights look, plus it could actually result in confrontation (individuals don’t like being flashed, particularly at midnight!).
Personally, I desire to work with the constraints of pure mild, and I additionally get uncomfortable flashing strangers in darkish settings. However when you really feel assured sufficient to shoot with flash, then by all means, strive it and see what you suppose. It can provide a improbable look when performed nicely.
Be aware that you would be able to have the flash do all of the work lighting the scene (in order that the foreground space seems lit and the background is totally darkish). However you can too set your digital camera to barely underexpose the scene, then use the flash so as to add some fill mild to your essential topics within the foreground.
7. Watch out when boosting the publicity

When photographing with a excessive ISO, it’s essential to nail the exposure; that means, you’re not compelled to extend the brightness when enhancing, which can exaggerate disagreeable noise results.
That being stated, you’ll sometimes run into conditions the place you by accident underexpose a shot. And when this occurs, you’ll haven’t any alternative however to lift the publicity when enhancing. Simply be sure to do it rigorously.
Right here’s my suggestion: First, ignore the noise and get the publicity and look right. If it’s a must to elevate the publicity a major quantity, the noise might be horrible, so that you’ll want to use some noise reduction.
There are various wonderful noise discount packages, however I like Lightroom’s built-in noise discount. If the noise remains to be dangerous after making use of the noise discount algorithm, strive bringing the picture into Photoshop to add a very slight Gaussian blur.
At that time, I typically use Lightroom’s grain settings so as to add texture again into the picture. The outcome seems rather more pleasing to the attention than excessive digital noise, and it could actually cover a number of the technical deficiencies of underexposed photographs. The picture is not going to look completely sharp, however it could actually nonetheless be lovely.
8. Don’t be afraid of blur and imperfection
Most avenue photographers purpose to get their images as sharp as attainable. Sharpness actually isn’t a nasty factor – however know {that a} picture can nonetheless look improbable even when it isn’t extremely crisp.
You see, when photographing at evening, you don’t have to freeze movement completely to get a surprising outcome. Personally, I maintain my day photographs to a better commonplace than my evening photographs. My day photographs have to look sharp, whereas my evening images merely have to be fascinating and look good, even when they’re a bit of blurry in locations.
Additionally, at shutter speeds from round 1/60s to 1/30s, it may be enjoyable to shoot handheld. Your topics will prove considerably sharp, but there might be a bit of movement, too. It’s an effective way so as to add a way of vitality to your compositions.
9. Let your evening avenue images look darkish
For my part, evening photographs ought to appear like they have been taken at evening. They need to be darkish, with deep shadows and areas which are laborious to see. Whenever you look at the histogram of an evening picture, it ought to be skewed towards the far left, particularly relative to your day photographs.
However once you level your digital camera towards a avenue scene at evening, it’ll typically overexpose the picture. The ensuing file will look shiny and also you’ll be capable to see loads of element, however the scene simply received’t really feel actual. (You’ll additionally find yourself with blown-out streetlights and retailer home windows.) In such circumstances, you’ll wish to decrease the exposure compensation in your digital camera barely or – when you’re capturing in Manual mode – enhance the shutter velocity, slim the aperture, or widen the ISO.
I do suppose that shiny evening photographs can look good. However darkish, sensible evening photographs are usually higher, so rigorously monitor the histogram and don’t be afraid to drop that publicity compensation as wanted.
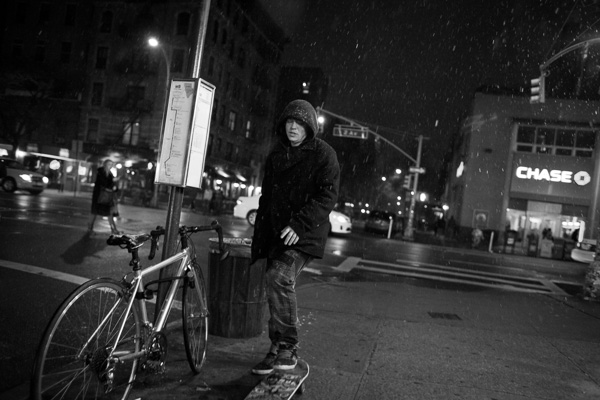
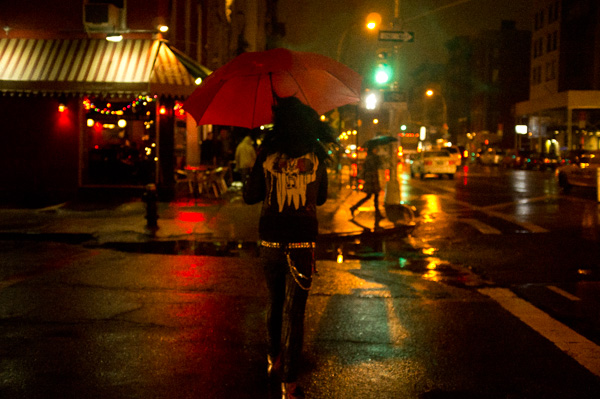
10. Shoot in dangerous climate
Venturing out into the evening when the climate turns bitter might be daunting. (I do know this from private expertise!) But it’s exactly these situations – snow, rain, fog, and sleet – that may remodel an extraordinary avenue scene into a photograph brimming with ambiance and emotion. Suppose snowflakes swirling below the glow of avenue lamps, or a foggy night with darkish figures shifting out and in of buildings. These components introduce a layer of complexity and temper that’s laborious to copy below clear skies.
That stated, embracing dangerous climate does imply dealing with some challenges. Temperatures usually drop at evening, and precipitation amplifies the danger of hypothermia; subsequently, even avenue images in the summertime might be uncomfortable and even harmful when the rain begins to pour. Plus, retaining your digital camera dry is usually a problem, and in worst-case situations, it’s possible you’ll even injury your tools.
Luckily, with the correct preparation, you’ll be able to (usually) stop these issues. Gown warmly – suppose coats, hats, gloves – and use a number of layers to maintain your self snug. To your digital camera, a easy rain cowl is usually a lifesaver. I additionally advocate bringing a rocket blower (so you’ll be able to rid your entrance lens factor of water droplets) and a small towel (so you’ll be able to wipe off your digital camera and lens barrel commonly). And no matter you do, don’t overlook that lens hood; in any other case, the precipitation will shortly cowl your lens and break your photographs.
Yet one more factor: Capturing in dangerous climate at evening is tough, and accepting that not each shot might be a masterpiece is a part of the method. Evening and opposed climate situations might be unpredictable, however in addition they open the door to distinctive photographic alternatives. In case you’re prepared to take numerous footage, likelihood is you’ll snag at the very least a few keepers. It’s all about persistence, perseverance, and a little bit of an adventurous spirit!
11. Watch out
This tip is totally crucial, nevertheless it’s additionally very troublesome to put in writing about. You see, relying on the place you’re capturing, heading out at evening with a digital camera will not be at all times the most secure concept. Then again, many areas are safer than you would possibly suppose at evening, particularly within the earlier night.
Subsequently, don’t be so afraid to shoot at evening that you simply by no means head out, but additionally just be sure you keep protected. Journey mild, preserve your tools to a minimal, and watch out about the place you go. Ensure you take note of your environment, and when you begin to really feel uncomfortable, head within the different path.
In case you’re unsure whether or not you’ll be able to safely {photograph} on the streets at evening, perform some research. I’d advocate messaging veteran avenue shooters within the space, although you can too have a look at basic articles and statistics overlaying metropolis crime charges.
Use your greatest judgment concerning who to {photograph}, and take into consideration bringing a good friend alongside. Don’t keep in a single place for too lengthy, and keep away from placing down your gear to vary lenses. Lastly, when you want better peace of thoughts, insure your gear earlier than you head out!
12. Focus in your enhancing expertise
The difficult lighting situations of evening avenue images typically imply that your photographs would require a contact of post-processing to actually shine – and that’s the place your enhancing expertise come into play. I extremely advocate buying (or subscribing to) a devoted photo-editing program; it’ll provide the instruments you should create pro-level photographs, and whereas the training curve is usually a bit important at first, it received’t take you lengthy to grasp the important methods.
Whenever you’re simply beginning out, pay particular consideration to the white stability and the publicity. Tweak these components till you get a pure, nice-looking outcome. Initially, you would possibly end up sliding controls backwards and forwards, experimenting till one thing clicks. That’s completely okay; in my expertise, this trial-and-error section is the way you develop a watch for what works.
As you develop extra snug with the instruments at your disposal, you’ll start to understand the facility of refined changes. You would possibly even begin to develop sure enhancing preferences, which you’ll be able to bake into your personal presets. (As an apart, creating presets can streamline the enhancing course of, plus they’ll make it simpler to realize constant outcomes throughout your portfolio!)
However the journey doesn’t finish there. When you’ve mastered the fundamentals, it’s time to play with extra superior methods like shade grading. This will add a stylistic aptitude to your photographs and actually set your work aside. With observe, you’ll discover that enhancing turns into a pure extension of your images, and you need to use it to specific your distinctive perspective on the nighttime cityscape!
The advantages and disadvantages of photographing the streets at evening
Nighttime avenue images comes with a number of main advantages – in different phrases, there’s a purpose for its reputation!
For one, the streets are usually emptier at evening, permitting you to isolate a topic or two with out problem – this could make for extra highly effective minimalistic photographs.
Photographing at nighttime with streetlights additionally provides a distinct temper to photographs, giving a way of thriller, nostalgia, drama, and even horror, relying on the way you method your photographs.
And budding avenue photographers – and much more achieved shooters – typically battle with worry or discomfort when photographing strangers. Working at evening, nevertheless, lends a way of distance and anonymity that makes for much less anxiousness.
In fact, evening avenue images comes with a number of important challenges. Cameras depend on mild to seize sharp, well-exposed photographs, and nighttime – as you might be undoubtedly conscious! – doesn’t supply a lot mild. To handle this, it’s essential to have an actual technical mastery of the digital camera; in any other case, you’ll find yourself with photographs which are blurry, grainy, or darkish (or a mixture of the three).
And as I emphasised above, photographing at evening in sure areas might be genuinely harmful. Clearly, this will depend on the placement, and it additionally will depend on the method you’re taking. Beneath, I supply ideas for taking correct security precautions at evening, nevertheless it actually is essential to maintain this in thoughts so that you don’t go in unprepared.
Ideas for evening avenue images: last phrases
Nicely, there you’ve got it:
All the things you should know for beautiful evening avenue photographs.
Getting lovely avenue images at evening isn’t at all times simple. However when you bear in mind the following tips and also you observe often, you’re certain to get some nice photographs!
Do you’ve got any avenue evening images ideas you’d like so as to add? Which tip do you intend to observe first? Share your ideas within the feedback under!
Nighttime avenue images FAQ
That actually will depend on the placement and your method. Nighttime avenue images might be comparatively protected, however there’s at all times a danger, so it pays to be cautious and take correct precautions.
I believe so! The streets can look fairly magical at evening and permit for an entire new kind of picture.
I’d advocate pushing your ISO as excessive as it could actually go with out inflicting a ridiculous degree of noise. You want a excessive ISO to realize a fairly quick shutter velocity, plus noise doesn’t look that dangerous in nighttime photographs.
Compact, light-weight cameras with bigger sensors are inclined to work nicely for avenue photographs at evening.
The 50mm focal size is a avenue images traditional, however as a result of the streets are usually emptier at evening, it’s typically simple to shoot at 35mm or wider to realize extra uncommon photographs.
-
GENERAL
-
PREPARATION
-
SETTINGS
-
LIGHTING
-
COMPOSITION
-
GEAR
-
ADVANCED GUIDES
-
CREATIVE TECHNIQUES
-
POST-PROCESSING
-
BUSINESS
-
INSPIRATION
-
OPINION


