
Your iPhone comes with a variety of unbelievable settings that can assist you create a wide range of portraits, proper in the meanwhile you are taking the pictures, or as we photographers wish to say, Make the Photographs.
On this tutorial you’ll discover ways to use Portrait Mode in your iPhone, earlier than and after you make the photograph. We cowl what Portrait Mode and Depth of Area are and learn how to use them, and take a look at the artistic Lighting Results you may add to your topic utilizing Portrait Mode.


Let’s first evaluate Portrait Mode.
What Portrait Mode Does and Why to Use It
Portrait Mode in your iphone makes use of synthetic intelligence to create a blurry background in order that your topic can stand out extra. Having issues blurry within the background and/or foreground is known as a Depth of Area impact. This impact is a artistic software that’s helpful for portraits.
For instance, in these two pictures you may see the distinction within the background. On the left, the chair, the portray, the TV and the window are all sharp. In the best one, all these parts at the moment are considerably blurry.


What’s Depth of Area?
Depth of area is the portion of your picture that seems in focus and sharp. While you hear or learn someplace {that a} photographer is utilizing shallow depth of area, that signifies that solely a really tiny portion within the image has sharpness on function, in order that it stands out and the remaining is blurry. Quite the opposite, deep depth of area is when you’ve got a bigger portion of your image seems in sharpness element, since you selected so and would love the viewer to understand all the things within the body as equal.
Often your telephone digital camera will provide you with a picture the place all the things is in focus and sharp, because it doesn’t know that you could be need make one thing blurry.
Find out how to Use Portrait Mode for With Artistic Depth of Area
- Open your digital camera app and select Portrait.
- As soon as inside you should have just a few choices. Begin with the default one: Pure Gentle. The iphone will provide you with directions if you’re too shut or too far-off to use the impact of depth of area. Comply with the directions till the title Pure Gentle turns into yellow.
- Faucet to take your first {photograph} with Portrait Mode!
The background, though it’s near the topic, turns into blurrier, making the topic stand out as sharper however nonetheless framed in entrance of the attractive nature:


Find out how to Apply the Depth of Area Look in Modifying
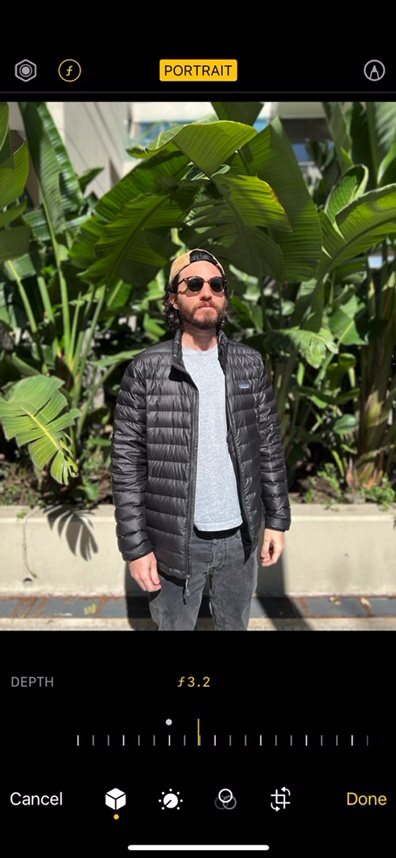
Now that you’ve a portrait performed with Portrait Mode, you may change the amount of Depth of Area within the enhancing mode. To vary the depth of area observe these easy steps:
- Faucet Edit on the highest proper nook.
- Choose the quantity displaying on the highest left (that’s the depth of area the digital camera captured for you)
- Alter the slider to the left, decrease quantity, to realize shallow depth of area (extra blurry background) or regulate the slider to the best, increased quantity, to realize deep depth of area (sharpness in all of the picture).
- When you select, click on Accomplished.
Extra Portrait Lighting Modes
Now let’s add some extra enjoyable to the portrait by utilizing some lighting strategies out there in your digital camera!
The Portrait Mode incorporates six Lighting modes that may aid you improve the sunshine and in addition play with the background of your picture. The primary one is Pure Gentle, which we used within the Portrait above: a blurred background whereas conserving the out there gentle.
Please observe that relying the place you make the pictures and with how a lot gentle you have already got in your picture, these changes might turn into roughly seen.
The second is Studio Gentle, which brightens the face of your topic to make it stand out extra.


The third is Contour Gentle, which provides a extra dramatic lighting.


The fourth is Stage Gentle, which turns the background to black and it’s used to isolate the topic from the background. Perhaps you don’t actually need to see what’s within the background or need to use this as in case you have been in a studio with a black backdrop.


The fifth is Stage Mono, which is analogous to the Stage Ligh,t however now making a black and white image.


The sixth is Excessive-Key Gentle Mono, which turns your background to white, mimicking a standard type of photographing utilizing numerous gentle on a white background.


Add Lighting Modes Later
As with the Depth of Area, in case you recorded in Portrait Mode you may as well select to edit the kind of lighting afterwards. You are able to do this by deciding on the photograph, urgent Edit and utilizing the sliding bar to select one other sort of lighting mode.
Now that you simply discovered extra concerning the Portrait Mode, exit and make your first pictures with shallow depth of area! The advantage of this expertise is that in case you do not like the end result, you may all the time change it in post-production by getting into the photograph, deciding on edit and urgent on Portrait. That choice will flip your Portrait Mode photograph into one with out the impact.
Subsequent Steps
When you created your first collection of portraits you may mess around with extra settings in your iphone. Listed here are just a few extra free tutorials and assets that can assist you discover smartphone images: